Fun with BBC Micro Bot
Posts
- Fun with BBC Micro Bot
- BBC BASIC Colour Cycling
- BBC BASIC Code Golfing Tips
- Colour Cycling Effects with Lines
- Colour Cycling Effects with Grids
- BBC Boing Ball
@bbcmicrobot
I’ve been having a lot of nostalgic fun with @bbcmicrobot lately.
BBC Micro Bot is a Twitter bot written by @DominicPajak.
The official page is here:
https://www.8bitkick.cc/bbc-micro-bot.html
If a tweet sent to the bot starts with a line number, it will run the tweet in the cloud as if it was a program typed into an 8 bit BBC Micro.
After 30 seconds it captures a 3 second animation and replies to your original tweet with the result!
— BBC Micro 🦉 Bot (@bbcmicrobot) March 3, 2020
BBC BASIC is perfect for this bot. As well as it being a great dialect of BASIC, there are lots of flexible graphics commands available, particularly compared to other dialects of BASIC available at the time and there are lots of ways to abbreviate the code which is ideal for trying to fit something interesting into the length of a tweet.
Blog
A few people have asked me questions about the programs I made so I thought I’d finally start a blog (something I’ve wanted to do for a very long time) and write some posts on the subject.
I was going to jump in and start explaining some of the programs I’d made but I realised there is a lot of background knowledge required first so in my first few posts I’ll try to give enough information to understand some of the BBC specific BASIC commands. Then I’ll cover some techniques that are useful when writing @bbcmicrobot programs. Hopefully then I can do a deconstruction of some of the programs I have written.
This won’t be a complete tutorial on BBC BASIC programming and I’m assuming you know some basic BASIC.
Here are a couple of resources you might find useful:
- BBC Micro User Guide html | PDF
- BBC Micro Advanced User Guide
- Graphics Extension ROM User Guide | Download
There are archives of old books around too.
Bear in mind this is a computer from the 1980s so if you are just learning programming there are probably more sensible modern alternatives to get started on :)
You're coding in BBC BASIC II (1982). pic.twitter.com/kcmR1v2p4S
— BBC Micro 🦉 Bot (@bbcmicrobot) February 15, 2020
Environment / Workflow
I’ve found it convenient to initially write my programs in BeebEm which is an excellent BBC Micro emulator.
Other BBC emulators are available. In a browser you can use JSBeeb but I find the keyboard layout a bit funky for prolonged use and some of the more advanced options may not be available.
Once I have a program more-or-less doing what I want, I start to look at reducing the size. At this point I switch to editing the program in the BBC Micro bot editor as this lets you see the character count and when you run the program shows a countdown which, while not exact, is useful to get an idea of the output the twitter bot might produce.
A great feature of the BBC Micro bot editor page is that the program is also stored in the URI so you can copy and paste the URI to save or distribute the program.
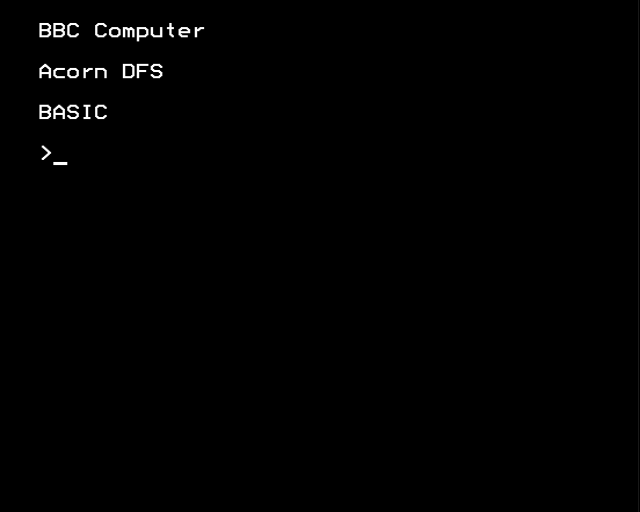
BBC BASIC Editing
If you type commands e.g.
>PRINT "HELLO"
HELLO
>_
they run in “immediate mode” and they will be executed immediately by the computer. If you type something starting with a number, it will be stored as a line in the program.
>10 PRINT "HELLO"
>20 GOTO 10
>_
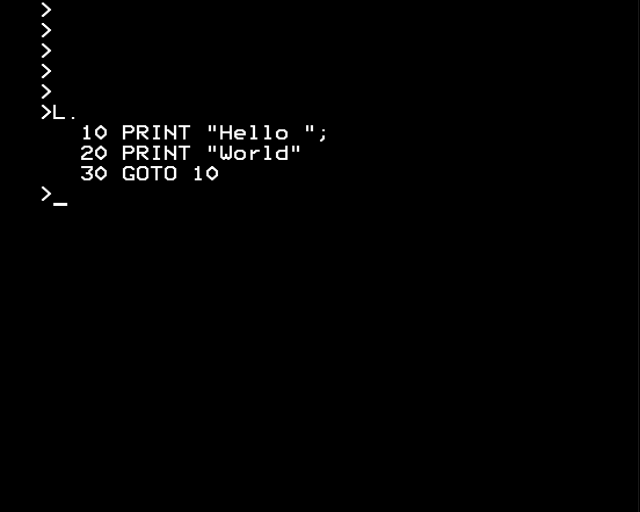
Type LIST (or the abbreviation L.) to show the program listing.
>10 PRINT "HELLO"
>20 GOTO 10
>L.
   10 PRINT "HELLO"
   20 GOTO 10
>_
Typing a number on its own will erase that line from the program.
Type RUN to run the program and press Escape to stop it when it is running.
You can renumber the lines in the program by typing RENUMBER (or REN.).
>5 PRINT "HELLO"
>10 GOTO 5
>L.
    5 PRINT "HELLO"
   10 GOTO 5
>REN.
>L.
   10 PRINT "HELLO"
   20 GOTO 10
>_
From the Edit menu, BeebEm let’s you copy and paste your whole program listing to/from the clipboard which means you can take it to/from an external text editor which can be very useful.
If you aren’t used to typing in programs on a BBC, the cursor move / copy functionality for editing BASIC programs is quite unique but worth learning. Use the cursor keys to move the cursor over some text you want to copy. Then pressing the copy key will act as if you typed the character the cursor is over (note that the COPY key is mapped to END on the PC keyboard in BeebEm and JSBeeb).
Type NEW to clear the program from memory or press the Break key (mapped to PC key Pause in BeebEM or JSBeeb) to reset the machine.
BBC BASIC Specifics
Some features specific to BBC BASIC are common in a lot of people’s @bbcmicrobot tweets. You can find out a lot more information about these in the BBC Microcomputer User Guide linked above, but here is a quick overview.
Integer Variables
If you see BASIC variables which end in a percent sign like A%, this means they are interpreted as integers (signed whole numbers). Generally operations on these will be much faster than on regular variables.
Graphics Commands
Graphics Modes
MODE X
(Where X is a number) sets the display mode. On startup the BBC is in MODE 7 which is teletext mode. This is mainly for text and doesn’t allow drawing with the graphics commands. The teletext font is nice though and it’s a good mode for editing programs.
Mode 0,1,2,4 and 5 are graphics modes supporting different numbers of colours and resolutions.
| Mode | Graphics Resolution | Display | Text |
|---|---|---|---|
| 0 | 640x256 2 colour display | 80x32 text | |
| 1 | 320x256 4 colour display | 40x32 text | |
| 2 | 160x256 16 colour display | 20x32 text | |
| 3 | 2 colour text only | 80x25 text | |
| 4 | 320x256 2 colour display | 40x32 text | |
| 5 | 160x256 4 colour display | 20x32 text | |
| 6 | 2 colour text only | 40x25 text | |
| 7 | Teletext display | 40x25 text |
I tend to use MODE 2 for graphics. It is lower resolution but it has the biggest palette of colours. If you break into your program and have changed colours so you can’t see anything, you can type
>MODE 7
to restore the default teletext mode.
Drawing Commands
In a graphics mode, there are a number of commands for drawing things to the screen.
The different graphics modes have different resolutions but regardless of the resolution, the graphics commands use drawing co-ordinates with a range from 0->1279 in X and 0->1023 in Y.
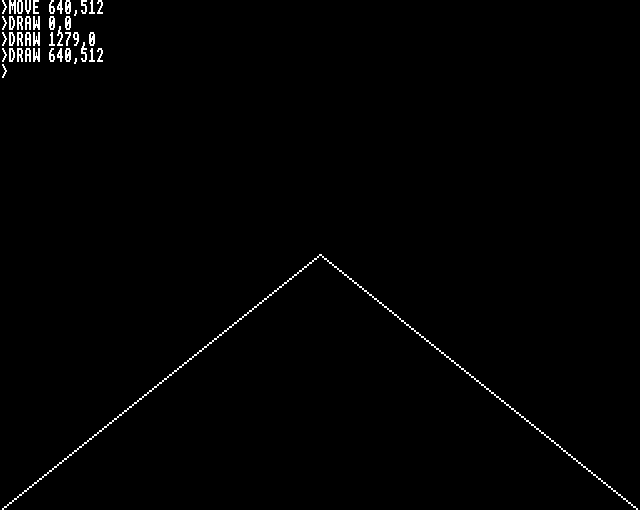
To illustrate drawing a line, we can type the following commands:
>MODE 0
>MOVE 640,512
>DRAW 0,0
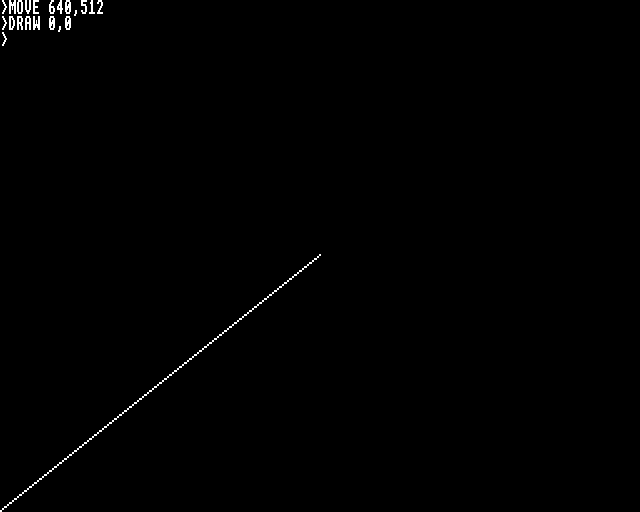
The MOVE command moves the graphics cursor to the screen X,Y co-ordinate specified (in this case 640,512 which is the centre of the screen) without drawing anything. The DRAW command will draw a line from the current position of the graphics cursor to the (absolute) screen co-ordinate specified, in this case 0,0 the bottom left corner of the screen. The position of the graphics cursor will be updated to be at the co-ordinates specified (i.e. the end of the line drawn). This lets you draw several connected lines (a line strip) easily.
>MODE 0
>MOVE 640,512
>DRAW 0,0
>DRAW 1279,0
>DRAW 640,512
The PLOT statement is multi-purpose and lets you draw points, lines and triangles with various different options. The first parameter to the PLOT command specifies what action to perform and also encodes some options for performing it.
Here are some of the more commonly used PLOT command codes.
To plot a single pixel, use PLOT 69,X,Y
>MODE 2
>PLOT 69,640,512
![]() nice.
nice.
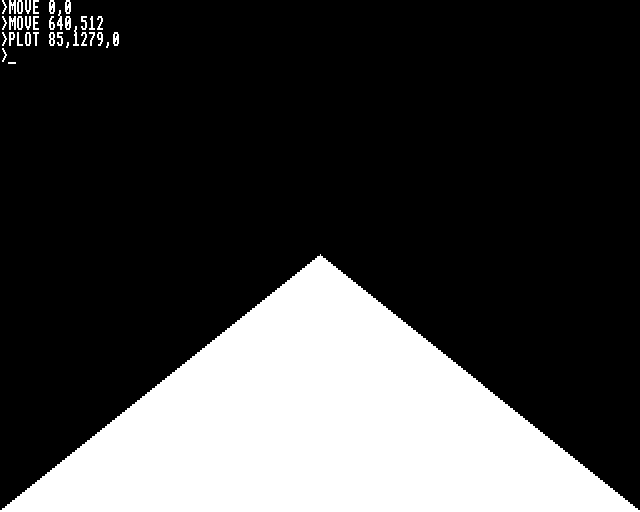
PLOT 85 can be used to draw a filled triangle. This draws a filled triangle between the point specified and the last two points visited.
>MODE 0
>MOVE 0,0
>MOVE 640,512
>PLOT 85,1279,0
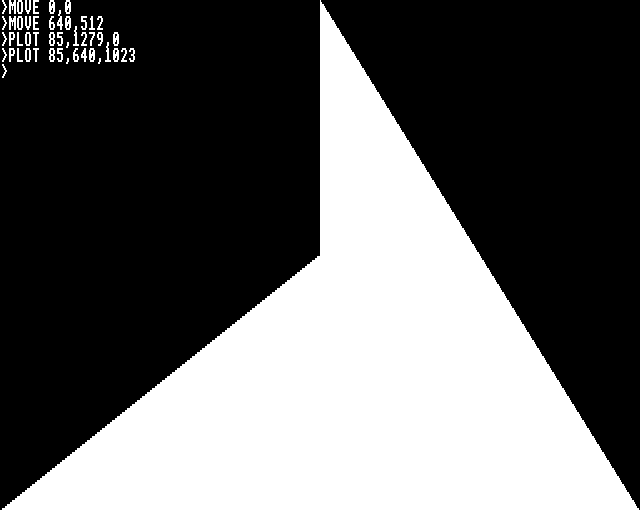
We can use repeated calls to PLOT 85 to draw a “triangle strip”.
>MODE 0
>MOVE 0,0
>MOVE 640,512
>PLOT 85,1279,0
>PLOT 85,640,1023
Other PLOT command options let you do things like draw dotted lines, omit the final pixel in a line, use relative drawing co-ordinates rather than absolute, use the graphics background colour instead of the foreground colour etc. You can read about the other options in the PLOT section of the BBC Micro User Guide.
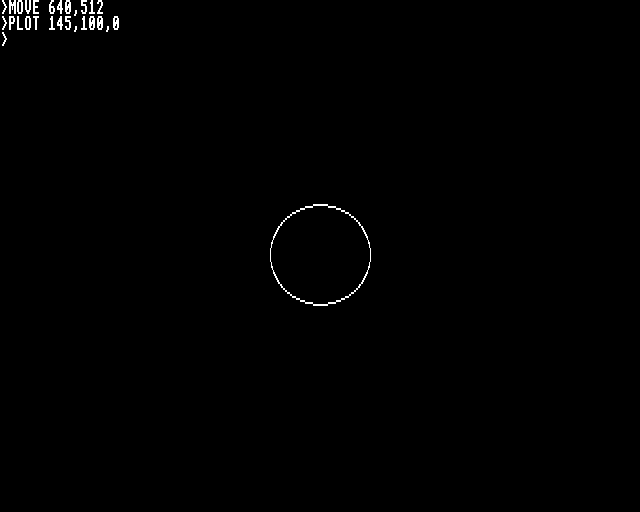
Graphics Extension ROM Drawing Commands
@bbcmicrobot is configured as if the machine has the Graphics Extension ROM installed. You can also download this ROM and configure the BeebEM emulated hardware as if it was installed.
This ROM adds lots of additional drawing commands and options like flood fills and copying / pasting screen regions and drawing with crosshatch patterns.
It also extends the PLOT command codes and allows filled circles and circle outlines to be drawn with the plot command.
e.g.
Filled Circles:
>MODE 0
>MOVE 640,512 :REM centre
>PLOT 153,100,0 :REM radius,0

Circle Outlines:
>MODE 0
>MOVE 640,512 :REM centre
>PLOT 145,100,0 :REM radius,0
Colour
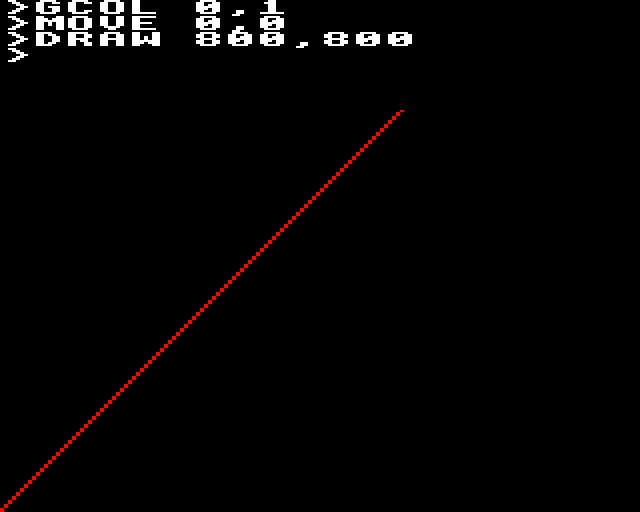
You can change the colour graphics are draw with using the GCOL (graphics colour) command.
This command takes two parameters. The first controls the drawing ‘style’. Typically this is set to 0 (which will overwrite whatever is currently on the screen). The second parameter is the (logical) colour value to set.
>MODE 2
>GCOL 0,1
>MOVE 0,0
>DRAW 800,800
The first parameter of GCOL controls the style which affects how the logical colour is merged with the logical colour already on the screen. It can take the following values:
| Value | Behaviour | Description |
|---|---|---|
| 0 | Plot | Overwrites the existing screen colour with the new one |
| 1 | Or | Performs a bitwise OR of the screen pixel’s logical colour and the new colour |
| 2 | And | Performs a bitwise AND of the screen pixel’s logical colour and the new colour |
| 3 | Xor | Performs a bitwise XOR of the screen pixel’s logical colour and the new colour |
| 4 | Inverse | Inverts the colour of any pixels drawn |
Inverse does not use the colour value set in the second parameter, it just ‘inverts’ the colour of any pixels drawn. For a two colour mode this means black pixels become white and white pixels become black. For modes with more colours this is extended so the “inverse colour” is the highest available colour in the mode we are in minus the value of the current pixel colour on the screen.
| Mode | Inverse Colour |
|---|---|
| 2 Colour Mode | 1 - Existing Colour |
| 4 Colour Mode | 3 - Existing Colour |
| 16 Colour Mode | 15 - Existing Colour |
Setting the Palette
When drawing graphics we specify a logical colour with GCOL. For each logical colour, the BBC stores a value which says how that logical colour should be displayed on the screen. This table of values is called the palette. We can change this palette to remap which logical colours are displayed on the output as which physical colours.
To do this we use a particular option of the general graphics command VDU.
Like the PLOT command, the first parameter to the VDU command specifies what action the VDU command should perform. Depending on this value, the number of parameters to the VDU command will differ. In this case we are using VDU 19 to set the colour palette.
For VDU 19 the second parameter is the logical colour we want to change and the third parameter is the physical colour we want to set it to.
VDU 19,logical,physical,0,0,0
The following physical colours are available:
| Physical Colour Value | Colour |
|---|---|
| 0 | black |
| 1 | red |
| 2 | green |
| 3 | yellow |
| 4 | blue |
| 5 | magenta |
| 6 | cyan |
| 7 | white |
| 8 | flashing black-white |
| 9 | flashing red-cyan |
| 10 | flashing green-magenta |
| 11 | flashing yellow-blue |
| 12 | flashing blue-yellow |
| 13 | flashing magenta-green |
| 14 | flashing cyan-red |
| 15 | flashing white-black |
e.g. if we run the above example that drew a red line:
>MODE 2
>GCOL 0,1
>MOVE 0,0
>DRAW 800,800
and then run the command:
>VDU 19,1,10,0,0,0
This will change the logical colour 1 from red to flashing green-magenta (yay?).
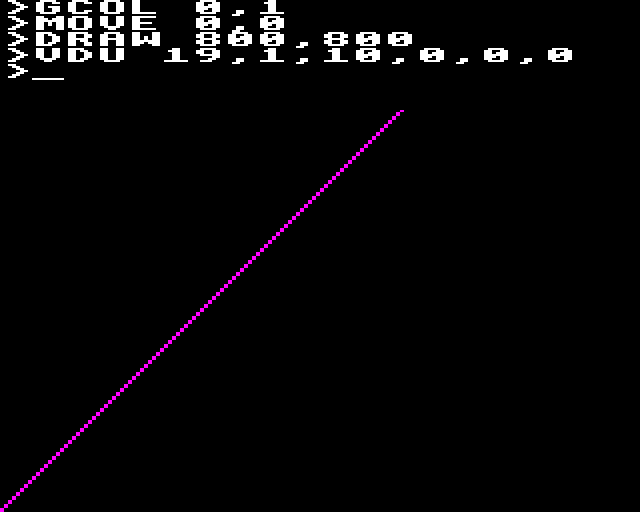
If we change the palette colours quickly every frame we can produce a number of different effects. This is called Colour Cycling.
Misc
Sometimes our program runs too fast or we may want to synchronize our graphics drawing with the display output. We can do this with the command:
*FX 19
Which will wait until the start of the next frame of the display which is refreshed 50 times per second.
The star means this is an operating system call. If called from a program, these commands starting with a star need to be the last thing on a BASIC program line.
If we are trying to fit our program on a single line, we may sometimes see this written in an alternative form:
OSCLI("FX19")
Compressed Tweets
You can optionally send @bbcmicrobot a “Base 2048” encoded tweet. Here, instead of using the regular ASCII characters that the BBC Micro expects, the program is first compressed with a Base 2048 encoding. This uses the additional characters that Twitter supports to fit longer programs in a 280 character tweet.
The encoded tweets look (even more) like random characters.
— BBC Micro 🦉 Bot (@bbcmicrobot) March 18, 2020
The bot will decode these characters back to ASCII before sending them to the BBC emulator.
You cannot directly read the program sent to the bots in this way from twitter.
To decode tweets that are encoded in this way, you can cut and paste the tweet into the BBC MicroBot editor and press the ? Decode base2048 button: https://editor.8bitkick.cc
To encode a tweet with base2048 you can use send a tweet from the editor with the option ?compress=true
Send a compressed tweet from: https://editor.8bitkick.cc/?compress=true
Happy Tweeting
Hopefully there is enough information in this post to start to understand or even write some tweets for @bbcmicrobot.
— BBC Micro 🦉 Bot (@bbcmicrobot) March 11, 2020
Here is an expanded and annotated version of the above program.
   10 DATA 63, 50, 100, 48, 67, -56, 20, 71, 51, 48, 47, -19, 36, 61, 20, 40, 60, -19, 31, 77, 19, 40, 76, -19, 66, 61, -19, 65, 117, 51, 97, 86, -17, 104, 95, 19, 93, 93, -19, 86, 132, 51, 85, 69, -19, 7, 6, 4
   20 MODE 1
   30 REPEAT
   40 READ X,Y,R : REM Get centre and radius for the next circle from the DATA
   50 C=1-SGN(R) : REM colour is encoded in sign of radius, set C to 0 or 2
   60 MOVE X*10,Y*10 : REM Move the graphics cursor to the centre of the circle
   70 GCOL 8*C,C : REM Set the colour. Note that the first parameter controls the dither pattern
   80 PLOT 153,R*10,0 : REM Draw the circle
   90 UNTIL X=85 : REM The last circle has an X position of 85
  100 FOR L=0 TO 2 : REM Loop so we can set the palette for colours 0,1 and 2
  110 READ P : REM Read the physical colour from the DATA
  120 VDU 19,L,P,0,0,0 : REM Set the palette for logical colour L to physical colour P
  130 NEXT L
Note, this is drawing filled circles so you need the Graphics Extension ROM installed to see output from this program
With the basics covered I will try in a future post to explain some of the tricks and techniques used in specific programs.
In the next post we will look at how Colour Cycling can be used for animation.